Table of Contents
Embark on your journey to linguistic mastery with this comprehensive guide, detailing every step to seamlessly integrate into a Live Class on IMMERSE. Whether you've meticulously planned your educational calendar by pre-booking a session, or find yourself with an unexpected window of opportunity to dive into a lesson, this guide ensures a smooth and effortless entry into our dynamic virtual classrooms. We'll cover everything you need to know, from initial access to full participation, guaranteeing you're prepared to maximize your learning experience.
Learn More About Viewing, Booking & Canceling Classes
✨ Live Classes are only available on select Corporate plans. If you do not have access to attend Live Classes, you will not see any of these options within your Homeroom. Please contact your account administrator with further questions.
How to Join
To begin, launch your IMMERSE homeroom in VR or from a web browser.
Booked Classes

-
Click > Home
-
Go to the My Upcoming Classes section
-
Hover over the Class Card with the Live Now status
-
Click > Join
Unbooked Classes When Live
From the Home Tab
The Recommended section of your Homeroom Home tab will cycle through different options, including showcasing Classes that are Live Now on the schedule for the Fluency Level you are set to.
-
Click > Home
-
Hover over the Live Class Tile in Recommended
-
Click > View
-
Click > Join
-
Wait to be admitted by the Guide

From the Schedule Tab
-
Click > Schedule
-
Select the current time on the class card that is live
-
Click > Join
-
Wait to be admitted by the Guide

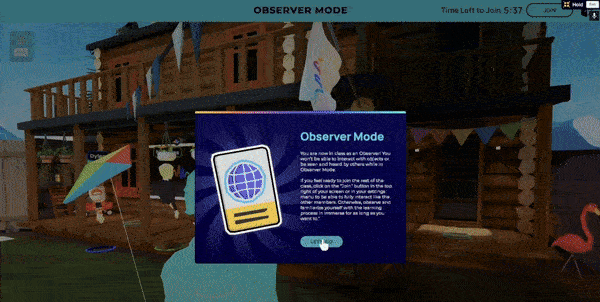
Observer Mode for Trial Users
This mode is available only for members within their free trial period so that new learners can get a sense of what Immerse classes are all about, with no initial pressure to participate! Once your free trial ends, this feature will no longer be accessible.
What CAN you do as an observer?
-
Move freely about the classroom space.
-
Be seen as floor-tokens by the Guide only (name included).
-
Enter as a participating member (within the first 10 minutes of lesson/timer) by clicking “Join” at the top of desktop screen OR left wrist of VR hand.
-
Choose to observe for all of the trial time you have. After the trial, this option will go away.
What can you NOT do as an observer?
-
Interact with any objects.
-
Be seen by any participating members (no name listed on entry notification, but is listed as observer in Setting Menu for all).
-
Join after the 10 minute lesson timer expires.
-
Communicate with anyone in the session. Observers CANNOT unmute themselves. A notification denying this action will pop up if they try.
How to Join as an Observer
Follow the steps above for joining a Booked Class or joining an Unbooked Class When live Instead of clicking Join:
-
Click > Observe
-
Click > Confirm after reading the notice to enter the class.
What to Expect
When you join a Live Class, you'll be teleported to the VR room where the Guide is hosting the session. While your connection is being finalized and your name pops up for the Guide to admit you, you'll see a waiting screen.

If you click "Leave" at this point, you'll exit the class waiting room and head back to the Homeroom. Once you're in, you'll spawn into the Scene with other learners (real people represented by avatars) and face the Guide, who will then welcome you and kick off the class.
Class Structure
Live classes are 40 minutes long, with an additional 10 minutes available after the Guide departs for students to explore scene objects, vocabulary, or continue practicing with classmates. While the general structure remains consistent, lower-level classes offer more structure, and higher-level classes provide more open-ended discourse opportunities. Refer to your level below for a detailed breakdown.
Learn More About The IMMERSE Curriculum
Level 1
-
Meet & Greet: Start with a friendly welcome, assess your comfort, and try out basic app functions like waving!
-
Scene Vocabulary Warm-up: Learn key words for the lesson's setting and activities.
-
New Vocabulary & Structures Lecture/Activity: Discover essential grammar and phrases you’ll use to meet the learning objective, followed by a quick comprehension check.
-
Communicative Practice: Combine new vocabulary with scene words to start forming your own sentences.
-
Pronunciation & Extension: Focus on improving your sounds and expand on new language concepts.
-
Productive Task: Practice new skills and structures on your own, putting what you've learned into action.
-
Wrap-up: Review your comfort with new skills and get a fun task for after class.
Levels 2-4
-
Warm-up: Activate your brain and assess your background knowledge for the lesson.
-
Core Lecture: Learn the main vocabulary and structures for the session.
-
Scenario A (Semi-Independent Practice): Practice new structures with some support in a realistic situation.
-
Mid-Lesson Lecture: Your Guide shares "emergent language," focusing on your strengths and areas to improve.
-
Scenario B (Independent Practice): Get more independent practice time with the new structures.
-
Wrap-up: Self-assess your learning and receive a task to continue practicing after class.
Level 5 (English & Spanish only)
-
Advanced Warm-up: Engage with the topic, activate prior knowledge, and explore existing understanding of new structures.
-
Lecture 1: Learn the first set of advanced vocabulary and structures for the lesson.
-
Controlled Practice 1: Practice with plenty of support to build confidence.
-
Lecture 2: Dive into the second set of advanced vocabulary and structures.
-
Controlled Practice 2: Practice again with support, but with less guidance than Practice 1.
-
Production: Engage in natural conversations, tasks, or activities with minimal or no support.
-
Wrap-up: Self-assess your progress and receive a task to continue practicing after class.
Level 6 (English only)
-
Warmup and Scenario Introduction: A friendly welcome. Sets the stage for the real-world problem or situation you'll tackle.
-
Task Discovery and Contextual Exploration: Dive into the task's context. Identify keywords, ideas, and clues to understand the challenge.
-
Language Deep Dive: Receive essential tools: key grammatical structures, new vocabulary, and crucial phrases for the lesson.
-
Collaborative Practice: Apply new linguistic tools. Practice with classmates in a guided, controlled manner.
-
Emergent Language Review: Your Guide provides helpful feedback on your practice, celebrating successes and refining areas. This prepares you for the final task.
-
Communicative Task Performance: The main challenge. Apply all learned concepts to complete a real-world task.
-
Wrap-Up: A quick poll is sent to assess understanding, especially of challenge points from the lesson.
👩🏼🏫 Group Work Expectations
Live Classes are more than just lessons; they're immersive experiences where you collaborate with other real learners worldwide, tackling exciting tasks, solving problems, and making decisions together. This highly communicative approach is at the heart of how languages truly flourish. Our Community Guidelines therefore highlight the importance of active participation - it's how we collectively build a positive and supportive learning space.
In classes, you'll spend significant time in partner and group work, gaining invaluable practice using new structures with peers at your level. We expect you to engage with your classmates thoughtfully, constructively, and respectfully, working together to meet each lesson's objective. This isn't just about practicing; it's about learning from each other in real-time, all while your language use is expertly observed by a Guide, providing insights for your continued growth. If any collaborative interaction becomes challenging, please don't hesitate to speak privately with your Guide or contact our Support Team. We're here to ensure your learning journey is smooth and rewarding.
Different Types of Prompts
ℹ️ Each scene contains multiple sets of prompts, and the same content applies to all prompts when activated. Prompt instances will begin from the start if the specific color set has not been previously utilized.
Instructions
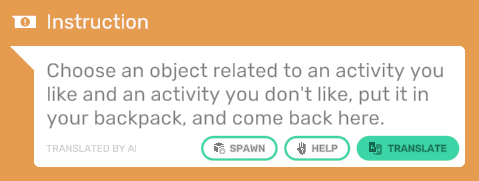
Activity instructions are sent by the Guide through a pop-up notification after modeling and explaining, so you can refer back to them at any point. Located in your class notes, you can utilize a translate button to have them translated into your display language or spawn the instructions into a card to hang in front of you.
Graphic Organizer
Similar to a traditional classroom, many class activities are centered around this large, interactive whiteboard, which features:
-
markers and erasers to either side
-
a sticky surface that you can place objects on
-
display variations for different activities, such as:
-
Content Grid
-
2 Groups
-
4 Groups
-
Calendar
-
World Map
-

While headers remain fixed, the tiles below the board can be repositioned through a simple drag-and-drop mechanism.
-
Computer: Click and hold the tile with your mouse, then drag and drop it to the desired location.
-
VR: Approach the board and use the handle trigger button (middle finger) on either controller to grab a tile. Move your arm to relocate it, press the joystick forward to extend, and release to place.
ℹ️ When you pick up a tile it will match your player color so the Guide knows who placed which tile.
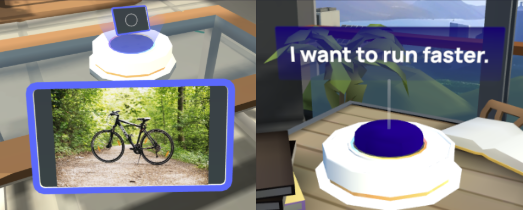
Cards and Buttons
Prompt cards display text or images within the scene. They are grabbable, allowing you to hold, expand, and place them on different surfaces. Cards guide you through activities or provide information. When pressed, buttons reveal a pop-up hologram.
To enlarge and place a prompt card:
-
On computer: Click on the prompt card to grab it, then click on the expand button on the center bottom of your screen to enlarge.
-
In VR: Approach the prompt card and grab it using the middle (handle) trigger on your controller. Once in your hand press the front trigger to enlarge. Let go of all triggers and it will float in place. To shrink, grab and press the front trigger again.
⚙️To prevent clutter, prompt cards will start disappearing from the scene (returning to their stack) once 20 of the same color have been pulled, starting with the first one pulled.
Random Selection: Spin the Wheel

A nested prompt with a spinning board containing multiple options. Spinning the board to land on an option is achieved by pulling the lever to the right.
-
To spin on a computer: click on the lever
-
To spin in VR: grab and pull the lever using the middle finger (handle) trigger on your controller
The prompts on the will board remain visible and can be landed on multiple times, as they are not removed or crossed off after being selected.
Random Selection: Dartboard

A nested prompt that displays a dart board with targets associated with each answer. To throw a dart:
-
On computer:
-
Click on the dart to pick it up
-
Right click using your mouse or trackpad on the spot of the board you want it to land on
-
-
In VR:
-
Grab the dart using the handle trigger (middle finger) on your right or left controller, don’t let go!
-
Extend your arm and aim at the spot on the board you want to hit
-
Press and hold the front trigger button with your pointer finger to show an intensity arrow with haptic feedback
-
Release the front trigger when you have the intensity you desire
-
ℹ️ When you grab a dart it will change to your player color, so the Guide can tell who threw which dart!
Select -an-option
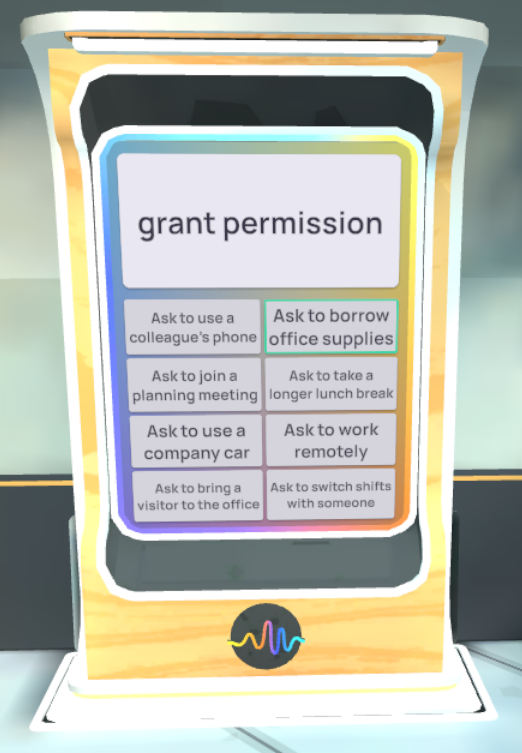
A nested prompt that shows a list of buttons for choices. When selected, the button reveals an answer. Click on buttons with your mouse on the computer, or use your actual hand in VR to select an option.
Polls
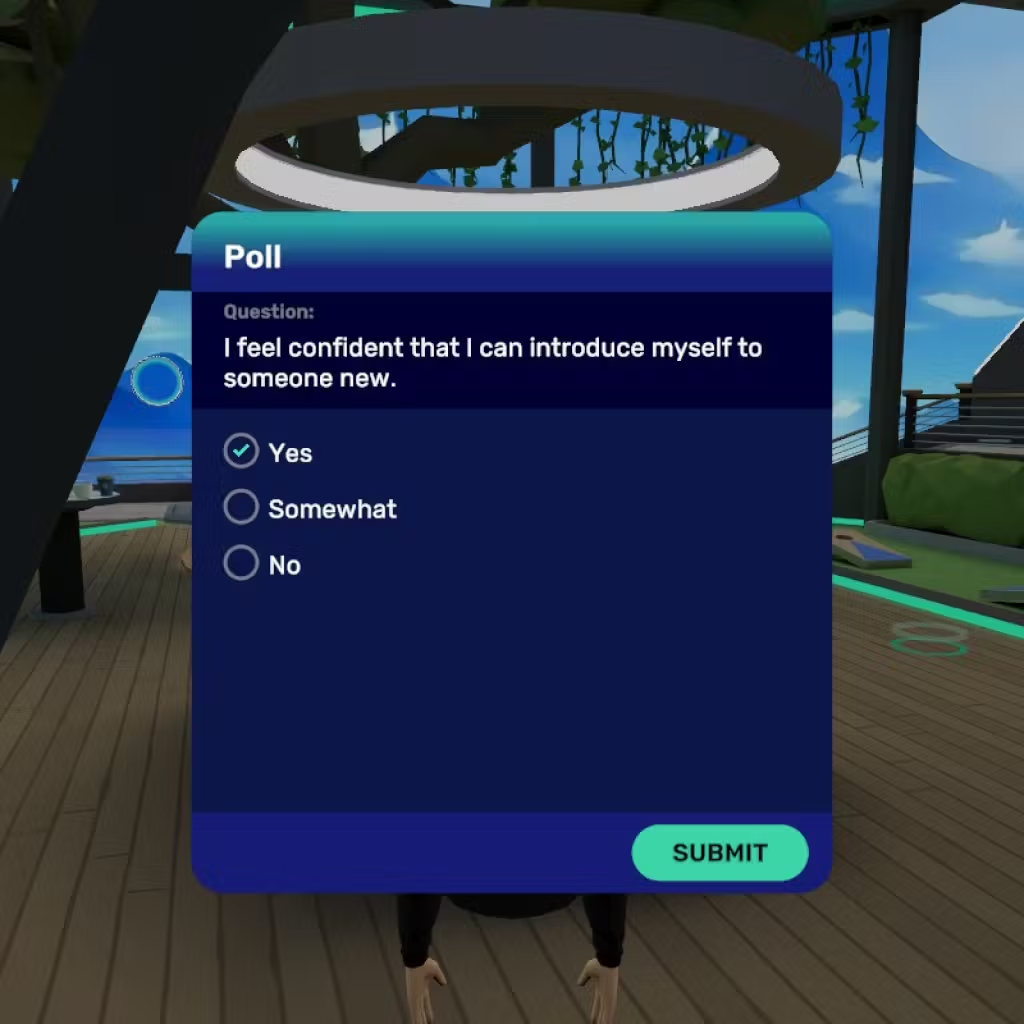
The poll feature is a versatile tool for Guides, primarily used at the end of a lesson to assess learners' comfort with the material. It also serves as a quick comprehension check during class. Guides can ask a question, and you’re able to answer individually and privately. Polls can include images and up to six answer choices.
🙋🏼 Asking for Help
Classes can move quickly, and your Guide might not always be immediately available to answer questions or help with issues. To make sure you can still get the support you need, we’ve included a Help Request feature that lets you request assistance discreetly during live classes.
-
Availability: Only available during an active class or event.
-
Functionality: Privately notifies your Guide of the type of help you need.
-
Request Options:
-
Help with the activity
-
Help with another student
-
Help with technical issues
-
Submitting a Help Request
In Virtual Reality (VR)
-
Open the Wrist Menu: Press the A button on your right controller to open the Geo menu.
-
Tap the Help Icon: Inside the Geo Menu, click the Help icon at the bottom left.
-
Select and Confirm: Choose the type of assistance you need and confirm your request.
-
Wait for Assistance: Your Guide has been notified and will assist you shortly.

On Computer
-
Open the Toolbar: Press SPACEBAR or click the Toolbox icon to open the toolbar.
-
Click Help Requests: Look for and select the Help Requests button on the right side of the toolbar.
-
Choose Your Request Type: Pick the type of help you need.
-
Confirm and Send: Confirm your selection to notify your Guide.
-
Wait for Assistance: Your Guide has been alerted and will assist you soon.

Leaving Feedback
After each class, a window will appear, allowing you to rate the lesson and your Guide. Your feedback is valuable to our Curriculum and Education teams. Should you prefer not to complete it immediately, you'll also find the same feedback questions in the completed class email you'll receive later.

If you have additional commentary that you'd like to provide the Education Team on a particular Guide, please direct your message to the Support Team at support@immerse.com and they will pass along the information to the appropriate Guide Manager.
Frequently Asked Questions
I was stuck buffering on "Waiting for Guide" in the Homeroom when trying to join. What does this message indicate, and why wasn't a Guide present?
-

If you get stuck on the joining screen when trying to enter a Live Class, it's highly unlikely that the Guide didn't show up. Instead, this issue almost always indicates that your device failed to connect to the live class instance, usually due to a problem with an API call to our servers.
The most common causes for a failed connection are:
-
- Connectivity Issues: Slow or unstable internet connection.
- Performance Issues: High resource usage (too many apps running), graphics problems, or firewall interference.
- Late Joining: Trying to join an unbooked class too close to the end of the 5-minute open registration window.
-
- Cancel your current join attempt.
- Navigate to a different page and then go back.
- Try joining the class again. (This refreshes the API call.)
- If the problem persists, log out completely, relaunch the app, and try joining one more time.
Why wasn't I admitted to the class I tried to join? I got stuck on the “Please wait for [name] to let you join” screen.
-
If you entered the Live Class waiting room (after being teleported from your Homeroom) but were not admitted by the Guide, there are a few possible reasons:
- System Bug: A technical issue may have prevented your name from appearing on the Guide's admission list.
- Connection Issue: An unstable internet connection during the second step of the two-step connection process (connecting from the waiting room to the Guide's instance) could be the cause.
What to do: If this issue occurs frequently, please contact our support team. It suggests a recurring system bug or a connectivity problem that we need to address to improve your experience.
How much time do I have to join a live class after it has started if I haven't booked it beforehand?
-
If you haven't booked a class but wish to join it once it's live, you have a 5-minute window from the official start time to do so.
Important Note: If you attempt to join very close to the 5-minute deadline when the "Join" option is about to deactivate, you may get stuck in the Homeroom with a "Waiting for Guide" message. This means the registration window has closed, and you won't be able to join because your attempt was made too late for the call to process correctly.
If I have an upcoming booked class that is starting soon, and am in a community scene, will I be notified to return to the Homeroom and join the class?
-
Yes! Even if you are in the Homeroom but not directly on the class join page, you will still get a notification that the class is starting soon. This alert appears two minutes before the start time. This gives you enough time to go back to the join page and connect to the class so you can participate in the learning opportunity you booked!

Why was my class canceled suddenly, without a prior notification?
-
Sometimes, Guides face unexpected technical issues that prevent them from starting or continuing a session. In these rare cases, the class must be canceled because it cannot proceed as scheduled. We apologize for the inconvenience caused by these unpredictable, last-minute cancellations.
If you were already attempting to join the class, the cancellation notice will not immediately appear in the app. This is due to a necessary wait time for our backend system to communicate with your app experience after the API call that occurs when you try to join. Unfortunately, we cannot bypass this to create an immediate pop-up notification.
To see the updated status, you must refresh the page (by navigating away and returning). However, please check your email, as cancellation notifications are sent out within minutes of the internal class cancellation.
More information is available in the following support article: Viewing, Booking, & Canceling Live Classes
Why did I get a “Missed Class” email even though I attended the class?
-
Attendance is currently recorded manually by Guides after each session. In rare cases, errors can occur where your attendance isn't saved correctly, leading to a "missed class" status and a corresponding email.
If this happens, please don't worry! Simply reach out to our Support Team at support@immerse.com. We will review your account activity, update your status to "attended," ensure the class is marked as completed in your Learning Path, and make sure you receive the class notes.
❓ For further support with joining a Live Class, please reach out to our team at support@immerse.com.